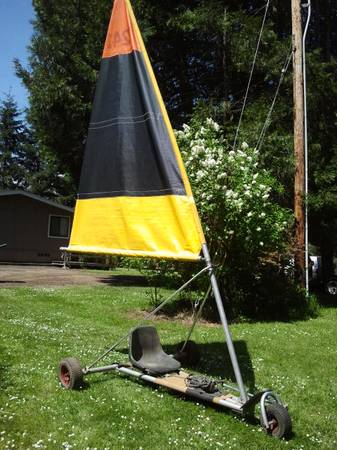
This evening I bought a landsailor!
It's a knockoff of a Manta Windjammer but a bit smaller - 5.5' wide vs 6' and 8' long vs 10'.
It's short enough so it *almost* fits in the back of the truck. One wheel ends up sticking out of the canopy and the mast too. I probably need to get a flag for the mast.
It needs a bit of clean up but I think it's going to be a blast!
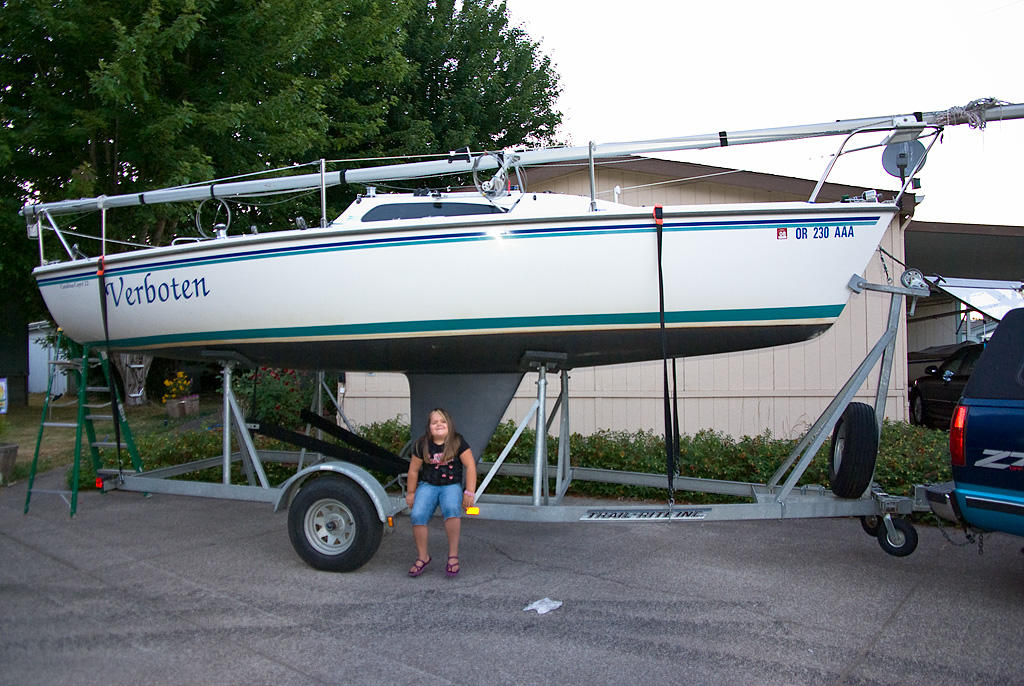
Adventures sailing "Verboten", our 2001 Catalina Capri 22, in the beautiful Pacific Northwest.
Monday, April 29, 2013
Sunday, April 28, 2013
It's not looking good . . .
Article in the Eugene Register-Guard (http://www.registerguard.com/rg/news/local/29786998-75/lake-says-fern-ridge-boats.html.csp) makes it seem likely that we're not gonig to get enough water to sail there this summer.
"In the first three months of 2013, only 5.09 inches of precipitation fell in Eugene, less than a third of the normal 17.14 inches.
It marked the lowest total since the beginning of local weather records in 1892 and only continued in April, which has seen only 1.44 inches — about half the normal amount."
And an inch less than 2001. *sigh*. On the plus side, the county may provide refunds or hold over the money we already paid until next year. That would be nice.
As an alternative I've been considering a few alternate options.
1) Buy a Stand Up Paddleboard from Costco. Price is not compleetely unreasonable but I've never tried one and I'm not sure that's what I want.
2) Buy an old 13' sailboat from Al. That would solve my sailing bug but it wouldn't handle both of us and it gives me another trailer to store.
3) Buy a land sailor that I saw on Highway 20 on the way home on Friday. That's what I'm leaning toward at the moment as it would give me a year-round activity and this particular one should fit in the truck, or on it if I get a rack.
Thursday, April 25, 2013
Will the lake fill?
April 25th and there's not enough water in the lake to launch. Last report said there were only 5 boats in at Richardson Park Marina. I'm not one of them, I need a foot more water.
AAaaaaggggghhhhh!!!!!
Wednesday, April 24, 2013
Trailer Upgrade
My buddy Lou, whom I taught to sail last summer, did me a huge favor this weekend and raised the winch/strap on my trailer.
Ever since we bought Verboten I've had issues getting her on the trailer at the end of the season. The issue was the placement of the winch a good foot below the bow eye. How can you pull the boat forward when the winch pulls it down?
Last summer I pulled the winch off and raised it a foot with wooden blocks. That seemed to help, though I still had to pull it forward a few inches with the come-along. Over the winter I talked to Lou and we decided that he could make something to address the issue. So last weekend I pulled the boat up to his house and Lou made a new winch mount that raised the strap about 14 inches.
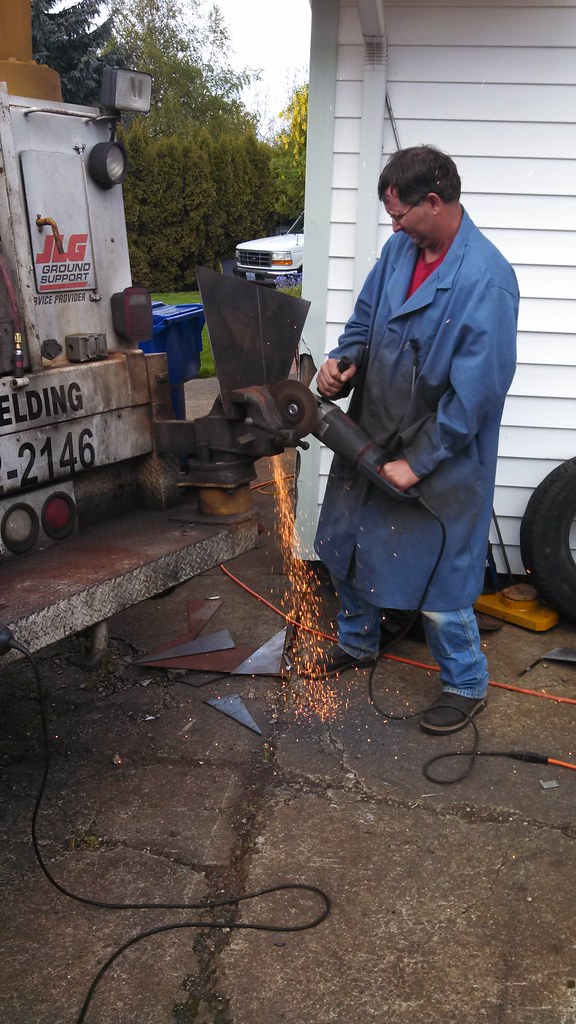
Lou is an artist with a grinder and welder! What we ended up with was a sturdy triangular box with a roller (which he made from pipe and washers) at the top. The winch goes on the forward side of the box and the strap goes over the roller at the top, then to the boat. Elegant.
Ever since we bought Verboten I've had issues getting her on the trailer at the end of the season. The issue was the placement of the winch a good foot below the bow eye. How can you pull the boat forward when the winch pulls it down?
Last summer I pulled the winch off and raised it a foot with wooden blocks. That seemed to help, though I still had to pull it forward a few inches with the come-along. Over the winter I talked to Lou and we decided that he could make something to address the issue. So last weekend I pulled the boat up to his house and Lou made a new winch mount that raised the strap about 14 inches.
Lou is an artist with a grinder and welder! What we ended up with was a sturdy triangular box with a roller (which he made from pipe and washers) at the top. The winch goes on the forward side of the box and the strap goes over the roller at the top, then to the boat. Elegant.
Monday, January 21, 2013
Electrical Mayhem Part Deux
It only took two COLD days but the job is done!
Sunday morning I pulled Verboten into the driveway and got to work. First half of the day (demolition) actually went pretty well. I disconnected the battery, then went to the stern and cut apart the wiring in the old battery box. The stock wiring for a Capri 22 Mark II is 10 AWG. Imagine my surprise when I found the wire running from the battery in the v-berth was 16 AWG! Yikes, talk about too small!
Once I had things cut apart I pulled out the original wires and ran them forward as far as they'd go. That turned out to be about 1/3 of the way through the quarterberth locker. No problem, I thought, I've got 20 feet of wire for the solar panel run, I'll have plenty. NOT! Turns out the run from the battery box to the v-berth is longer than the boat! Who knew! So I went and bought more wire (8 feet each of red & black). Which wasn't enough, either.
At this point I had the wire run from the solar panel to the new charge controller done, though the controller wasn't mounted in the v-berth locker yet. The wire run from the panel to the same locker was done too and ate up more of that 8 feet of wire than I expected. I spent quite a bit of time mulling over placement of the switch and trying to figure out how to get the bits I hadt left to work. Nope, can't do it. By that time it was around 5:00, the temps were dropping, and the halogen light was no longer keeping the cabin warm. Plus I ached all over. So I called it a night.
This morning I woke up to snow! Not what I really wanted to see, especially since it was over a layer of frozen fog. I ran to Napa and picked up 2 more 10' spools of wire. No snow closer to town. Weird. Oh yeah, the partial gallon of distilled water I left in the boat was full of ice. Yeah, it was cold in there.
While Deborah was in town I got to work. First order of business was fitting a 3 way switch into the side of the v-berth. I don't have a 2-5/8 hole saw so it was dremel to the rescue. About 30 minutes of work gave me a round(ish) hole that was a perfect fit for the switch, and a big pile of powdered fiberglass in the locker to vacuum up.
Once the mess was cleaned up I mounted the solar charge controller in the locker and connected the wires from the solar panel, which already had ring terminal ends on them. I ran the wires for the connection to the battery, then went to work on connecting the ends and hooking everything up. I salvaged the buss from the original setup in the stern, and used it to gang together the negative wires, then started on the swiitch. Guess who was 2 ring terminals short. D'oH! Must be time for lunch and a break. Got the portable 120v charger out of the shed and hooked it up to try and get a full charge on the battery then went in to warm up and eat..
Deborah got home after a bit so back to the auto parts store for more ring terminals. I hooked things up and . . . nothing! WTF?! Time to start checking things over. Continuity seems to be fine, the switch is working as expected, so what's the problem? A bit of monkeying with things and I figured out that the master breaker on the main panel wasn't working quite right. It was sticking and wasn't actually turned on. Hmm. Hopefully that was just a symptom of the freezing cold weather and not something that I'll have to replace in the spring.
Once everything was working I decided to try hooking up the "load" on the charge controller to the #2 position on the switch instead of the charger wire, which I tied off to the #1 with the battery. Even with the switch in the off position I got a circuit that way. Not sure I completely understand why but the switch internals apparently don't work the way I think they do. Went back to the original plan and I'll do something else with the load; maybe a 12v fan.
Got things cleaned up (what a mess I made!) and ran the boat back down to the lockup around 4 PM.
So, I've now got 2 clean wiring paths on appropriately sized wire. Setting the switch to #1 turns on just the battery; #2 is just the solar panel, which makes the LED lights flicker, so maybe not too useful; 1+2 is the winner with both the battery and the solar panel. #0 turns everything off, which is probably a good choice when we're on the road towing.
Sunday morning I pulled Verboten into the driveway and got to work. First half of the day (demolition) actually went pretty well. I disconnected the battery, then went to the stern and cut apart the wiring in the old battery box. The stock wiring for a Capri 22 Mark II is 10 AWG. Imagine my surprise when I found the wire running from the battery in the v-berth was 16 AWG! Yikes, talk about too small!
Once I had things cut apart I pulled out the original wires and ran them forward as far as they'd go. That turned out to be about 1/3 of the way through the quarterberth locker. No problem, I thought, I've got 20 feet of wire for the solar panel run, I'll have plenty. NOT! Turns out the run from the battery box to the v-berth is longer than the boat! Who knew! So I went and bought more wire (8 feet each of red & black). Which wasn't enough, either.
At this point I had the wire run from the solar panel to the new charge controller done, though the controller wasn't mounted in the v-berth locker yet. The wire run from the panel to the same locker was done too and ate up more of that 8 feet of wire than I expected. I spent quite a bit of time mulling over placement of the switch and trying to figure out how to get the bits I hadt left to work. Nope, can't do it. By that time it was around 5:00, the temps were dropping, and the halogen light was no longer keeping the cabin warm. Plus I ached all over. So I called it a night.
This morning I woke up to snow! Not what I really wanted to see, especially since it was over a layer of frozen fog. I ran to Napa and picked up 2 more 10' spools of wire. No snow closer to town. Weird. Oh yeah, the partial gallon of distilled water I left in the boat was full of ice. Yeah, it was cold in there.
While Deborah was in town I got to work. First order of business was fitting a 3 way switch into the side of the v-berth. I don't have a 2-5/8 hole saw so it was dremel to the rescue. About 30 minutes of work gave me a round(ish) hole that was a perfect fit for the switch, and a big pile of powdered fiberglass in the locker to vacuum up.
Once the mess was cleaned up I mounted the solar charge controller in the locker and connected the wires from the solar panel, which already had ring terminal ends on them. I ran the wires for the connection to the battery, then went to work on connecting the ends and hooking everything up. I salvaged the buss from the original setup in the stern, and used it to gang together the negative wires, then started on the swiitch. Guess who was 2 ring terminals short. D'oH! Must be time for lunch and a break. Got the portable 120v charger out of the shed and hooked it up to try and get a full charge on the battery then went in to warm up and eat..
Deborah got home after a bit so back to the auto parts store for more ring terminals. I hooked things up and . . . nothing! WTF?! Time to start checking things over. Continuity seems to be fine, the switch is working as expected, so what's the problem? A bit of monkeying with things and I figured out that the master breaker on the main panel wasn't working quite right. It was sticking and wasn't actually turned on. Hmm. Hopefully that was just a symptom of the freezing cold weather and not something that I'll have to replace in the spring.
Once everything was working I decided to try hooking up the "load" on the charge controller to the #2 position on the switch instead of the charger wire, which I tied off to the #1 with the battery. Even with the switch in the off position I got a circuit that way. Not sure I completely understand why but the switch internals apparently don't work the way I think they do. Went back to the original plan and I'll do something else with the load; maybe a 12v fan.
Got things cleaned up (what a mess I made!) and ran the boat back down to the lockup around 4 PM.
So, I've now got 2 clean wiring paths on appropriately sized wire. Setting the switch to #1 turns on just the battery; #2 is just the solar panel, which makes the LED lights flicker, so maybe not too useful; 1+2 is the winner with both the battery and the solar panel. #0 turns everything off, which is probably a good choice when we're on the road towing.

Saturday, January 19, 2013
Electrical Mayhem
Last season I kept seeing these weird, cyclical drops in voltage, to the point that the GPS/Chartplotter would throw a low voltage alarm. The solar panel charge controller showed a green light when the panel was plugged in and unplugging it had no effect on the fluctuations. I checked the wiring, tightened up the screws and redid a couple of crimp connectors.
That seemed to help, but by mid-season I had to replace the battery. The voltage cycling continued but seemed to throw alarms less often. The new battery didn't seem to hold the same voltage as the old one (when new) but I chocked that up to different manufacturers.
Fast forward to last weekend. I've got a new multimeter and the sun was out, so I decided to go check on the boat and take a look at the wiring while I was at it.
Eventually I worked my way back to the stern battery locker (my battery is in the v-berth) where I started to test the connections there. When I got to the charge controller I was a bit baffled to find 12.7v on the power in and power out sides, especially since the panel was putting out 20-22v depending on whether the sun was behind a cloud or not. And the green "ok" light was on. Hmmm. I disconnected the charge controller and did some testing with it only connected to the panel. 20-22v at the power in, fluctuating 3-4v at the power out. Ah ha! It's dead! I guess 5 years of nearly constant use, in a not very dry battery locker, was too much for it.
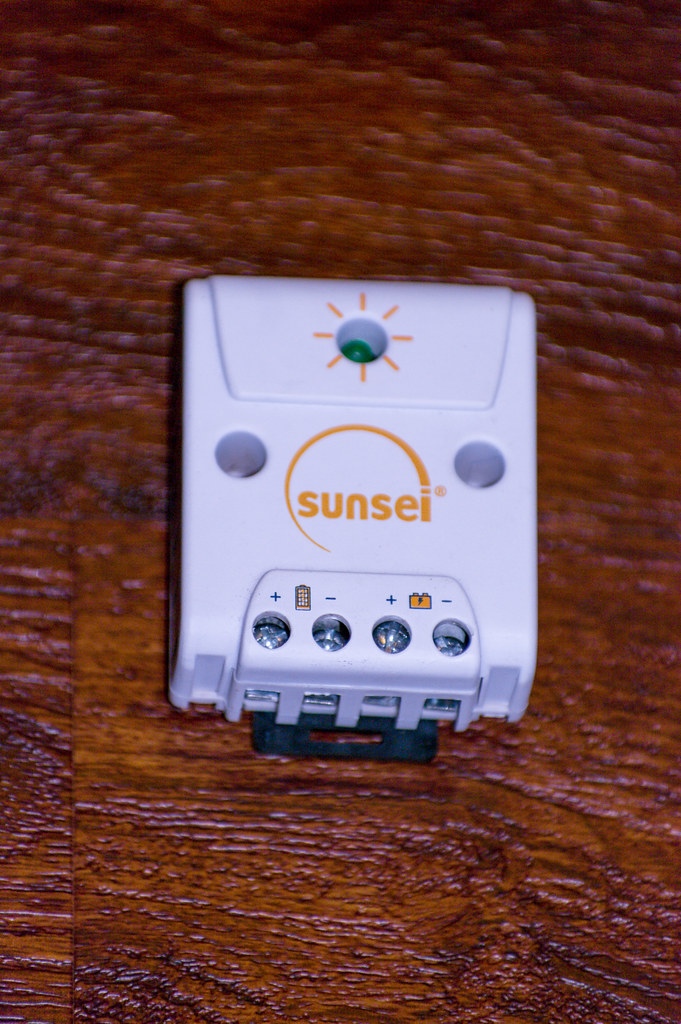
I drove down to the local RV place to see what they have. $150 for a controller capable of charging 4 banks of batteries, but only intended for dry applications. Uh, no, I don't think so. He did give me a website with the exact replacement (except with a blue case) for the dead Sunsei controller. I went home and did some research. There aren't many inexpensive (less than $150) options that are appropriate for a small sailboat. One option is the SunSaver line, which has all of the electronics sealed in epoxy. Perfect! Not waterproof but way better than the exposed breadboard on the Sunsei, so I ordered one.
This one looks to be "smarter" than the old one, plus it has an extra set of connections for a direct load from the solar panel. That will come in handy if/when I decide to put a powered vent in. A powered vent or fan won't get any light under the tarp in the winter but it will if it's hooked up to a solar panel. Hmmm.
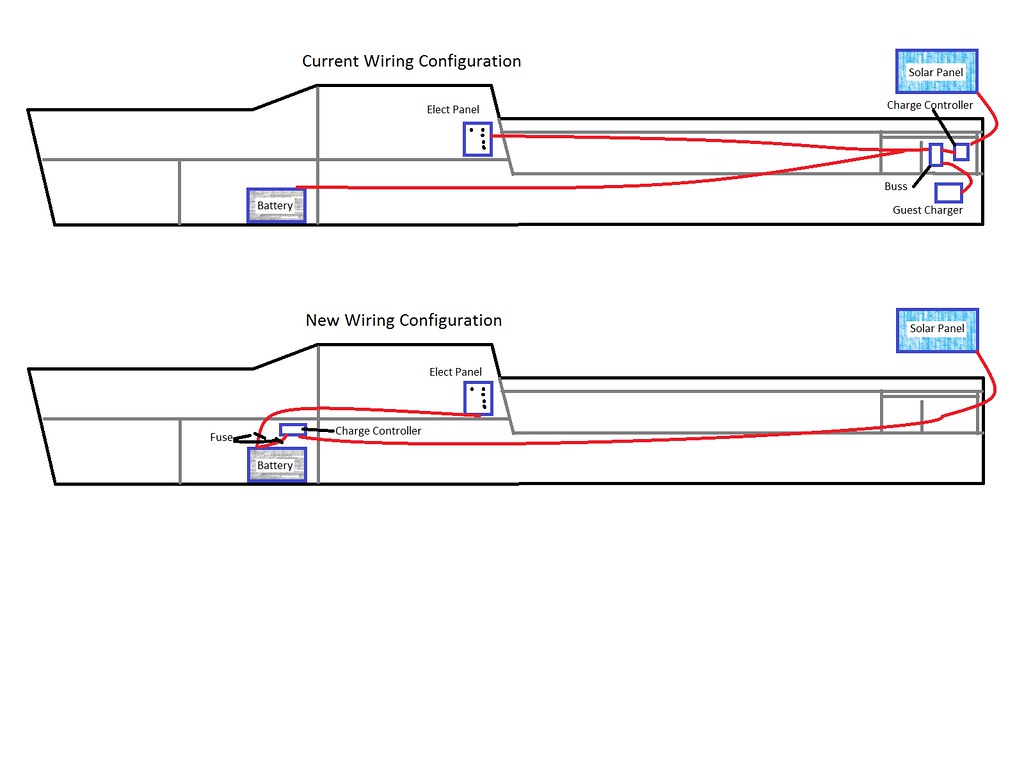
Today I ran to Knechts for some wire, fuses, and connectors so I can hook things up. I've been mulling over the way the wires run from the battery in the v-berth, back to the stern battery compartment, then to the electrical panel. Everything is connected together, including the 120v Guest Charger that boils batteries, and I really don't like that. Plus it seems like an inordinately long run for no good purpose. The manual for the SunSaver calls for the controller to be within about 6 feet of the battery, which means it goes in the cabin. Sounds like a new wiring plan is needed. Here's what I came up with . .
I'm basically doing away with all of the connections in the stern except for the solar panel. The Guest Charger will come out, though I'll leave the 120v outlet and extension cord; those are handy when I need to run a shop vac or other 120v tool on the trailer.
Depending on the wire size, I'll either reuse the existing wire that runs from the stern to the battery for the solar panel or I'll replace the run with the 10AWG wire I bought today. I'll pull the original battery cables out and run them forward to the battery; I hope they'll be long enough that I can just reroute them without having to add an extension. That will give me a single run from the solar panel to the controller/battery and another, shorter, run from the battery to the main breaker panel. I think that will be more efficient and less prone to issues. I'll add fuses to both lines (battery/main panel and solar controller/battery) which should improve the overall safety of the system (there are no fuses now).
Should be an interesting adventure tomorrow . . .
That seemed to help, but by mid-season I had to replace the battery. The voltage cycling continued but seemed to throw alarms less often. The new battery didn't seem to hold the same voltage as the old one (when new) but I chocked that up to different manufacturers.
Fast forward to last weekend. I've got a new multimeter and the sun was out, so I decided to go check on the boat and take a look at the wiring while I was at it.
Eventually I worked my way back to the stern battery locker (my battery is in the v-berth) where I started to test the connections there. When I got to the charge controller I was a bit baffled to find 12.7v on the power in and power out sides, especially since the panel was putting out 20-22v depending on whether the sun was behind a cloud or not. And the green "ok" light was on. Hmmm. I disconnected the charge controller and did some testing with it only connected to the panel. 20-22v at the power in, fluctuating 3-4v at the power out. Ah ha! It's dead! I guess 5 years of nearly constant use, in a not very dry battery locker, was too much for it.
I drove down to the local RV place to see what they have. $150 for a controller capable of charging 4 banks of batteries, but only intended for dry applications. Uh, no, I don't think so. He did give me a website with the exact replacement (except with a blue case) for the dead Sunsei controller. I went home and did some research. There aren't many inexpensive (less than $150) options that are appropriate for a small sailboat. One option is the SunSaver line, which has all of the electronics sealed in epoxy. Perfect! Not waterproof but way better than the exposed breadboard on the Sunsei, so I ordered one.
This one looks to be "smarter" than the old one, plus it has an extra set of connections for a direct load from the solar panel. That will come in handy if/when I decide to put a powered vent in. A powered vent or fan won't get any light under the tarp in the winter but it will if it's hooked up to a solar panel. Hmmm.
Today I ran to Knechts for some wire, fuses, and connectors so I can hook things up. I've been mulling over the way the wires run from the battery in the v-berth, back to the stern battery compartment, then to the electrical panel. Everything is connected together, including the 120v Guest Charger that boils batteries, and I really don't like that. Plus it seems like an inordinately long run for no good purpose. The manual for the SunSaver calls for the controller to be within about 6 feet of the battery, which means it goes in the cabin. Sounds like a new wiring plan is needed. Here's what I came up with . .
I'm basically doing away with all of the connections in the stern except for the solar panel. The Guest Charger will come out, though I'll leave the 120v outlet and extension cord; those are handy when I need to run a shop vac or other 120v tool on the trailer.
Depending on the wire size, I'll either reuse the existing wire that runs from the stern to the battery for the solar panel or I'll replace the run with the 10AWG wire I bought today. I'll pull the original battery cables out and run them forward to the battery; I hope they'll be long enough that I can just reroute them without having to add an extension. That will give me a single run from the solar panel to the controller/battery and another, shorter, run from the battery to the main breaker panel. I think that will be more efficient and less prone to issues. I'll add fuses to both lines (battery/main panel and solar controller/battery) which should improve the overall safety of the system (there are no fuses now).
Should be an interesting adventure tomorrow . . .
Sunday, October 21, 2012
When it rains it pours.. .
With sailing season pretty much relegated to memories I have more time for my other hobby, photography. Deborah had Furlough Friday so I took the day off too. Even though the weather was gloomy and wet, we drove east to check out a couple of waterfalls Heidi had told us about.
First stop was Clear Lake. It was raining but the wet just brings out the fall colors better.


Next stop was Sahalie Falls a few miles down Hwy 126. It was raining pretty good there. I took both K20D's, the tripod and the DA* 300/4 (which never left its bag).
Things started off well; the clouds brought the light down enough that I didn't need a neutral density filter but could still shoot 1/2 second to smooth the cascading water.
Sahalie Falls


The trail is pretty nice, with steps in the steeper locations.


Little Salahie Falls(?)


Along about here my original K20D (I have 2) stopped working. I swapped out batteries and nothing. About 5-10 minutes later I noticed the back of the camera was getting hot even though it was turned off. Not good. I pulled the batteries.
On down the hill to Koosah Falls.


Deborah went on ahead while I was taking these photos. I continued on down the path and thought I'd joined the same one she was on. Not! Turned out I was on a path to the campground and reservoir. Luckily I headed uphill when given the choice and eventually found her at the Koosah Falls trail head where we'd planned to meet.
We decided not to take the trail back and walked up the highway instead. We were both pretty much soaked through so we called it a day and headed back home.

When I got home I checked over the camera. Everything looked normal except for a sheen of moisture in the battery compartment. Not good. I dried it and the camera turned on, for about 1 second. Into a bag of rice overnight. That helped but the image stabilization is not working right.
Back into the bag of rice . . .
First stop was Clear Lake. It was raining but the wet just brings out the fall colors better.
Next stop was Sahalie Falls a few miles down Hwy 126. It was raining pretty good there. I took both K20D's, the tripod and the DA* 300/4 (which never left its bag).
Things started off well; the clouds brought the light down enough that I didn't need a neutral density filter but could still shoot 1/2 second to smooth the cascading water.
Sahalie Falls
The trail is pretty nice, with steps in the steeper locations.
Little Salahie Falls(?)
Along about here my original K20D (I have 2) stopped working. I swapped out batteries and nothing. About 5-10 minutes later I noticed the back of the camera was getting hot even though it was turned off. Not good. I pulled the batteries.
On down the hill to Koosah Falls.
Deborah went on ahead while I was taking these photos. I continued on down the path and thought I'd joined the same one she was on. Not! Turned out I was on a path to the campground and reservoir. Luckily I headed uphill when given the choice and eventually found her at the Koosah Falls trail head where we'd planned to meet.
We decided not to take the trail back and walked up the highway instead. We were both pretty much soaked through so we called it a day and headed back home.
When I got home I checked over the camera. Everything looked normal except for a sheen of moisture in the battery compartment. Not good. I dried it and the camera turned on, for about 1 second. Into a bag of rice overnight. That helped but the image stabilization is not working right.
Back into the bag of rice . . .
Subscribe to:
Posts (Atom)